Pocher Paint Tips
By David Cox
One of my most frequently asked questions regarding Pocher construction is “What kind of paint do you use?” After building nearly 80 Pocher projects, and after hearing that same question for twenty years, it is tempting to just say the truth, “The type of paint does not matter.” Usually, courtesy gets the best of me when I recall asking the same question of model builders when I was starting out, and I go into a long-winded, anecdote-laced explanation of the horrors that await the beginner Pocher painter, complete with endless examples and much hemming and hawing about forgotten names of models, brand names, and techniques. For all of you who have endured these lectures, I thank you for your kindness; for all of you looking for a clear and useful answer, this is for you.
The “paint doesn’t matter” answer above is true; the brand of paint and to some extent the type of paint is far less important than the preparation of the body panels. Here is what I do: Wash all panels to remove any fingerprints or mold-release compounds left over from the factory. After twenty or so years, there is no telling what dirt and grime has made its way onto the surface of the plastic, and there is no sense in grinding these contaminates into the plastic when you sand the surfaces.
As with all raw body panels, Pocher panels need to be sanded. There is no good reason to hope that paint will like the polished surface of a Pocher fender. I use 400 grit dry sandpaper from 3M, and I sand the panels until they are uniformly dull and the edges are smooth.
Every panel has to be primed. I use aerosol primers in oxide red, gray, or white, depending on the finish color It is best if the primer is lighter than the color coat, although there are no rules. Using a white primer under a translucent red will result in a very bright red, and using a white primer under black will have little effect. The idea is to experiment to find what looks best.
Every primed panel must be sanded. I use my trusty 400 grit dry 3M paper and sand each panel until it is uniformly dull. If I cut through the primer, I re-prime the panel.
If I have done the sanding correctly on the bare panels, there should be little or no need for fillers or spot putties. If such putties are necessary, I like to use a polyester product from EverCoat which uses a catalyst hardener. I like this over the epoxy products because it is approximately the same hardness as the Pocher styrene and is easy to sand. To knock down the filler, I use 220 grit 3M wet paper, but without any water. Polyester fillers can absorb water, so avoid wet sanding. The same is true for most lacquer primers, so avoid wet sanding on either primers or fillers, and especially on combinations of both.
When the primered surface is perfect—if it looks as if all I need to add would be some clear gloss to achieve a nice gray (oxide red or white) paint job—it is time to paint. To this point, I have usually spent 10-20 hours.
I use acrylic enamels with a catalyst hardener. I have used lacquer and enamel from aerosols, and they work fine, too. The acrylic enamels from the auto body paint store have the advantage of color range and durability, but the main advantage is that they are dry to the touch within about an hour and can be wet-sanded. The main thing here is that it is unlikely that anyone can get a good result without practice, no matter what material or equipment is used. I practice on plastic soft drink containers—cans or Big Gulp cups work great—until I feel confident that the paint will do what I am asking of it.
Most of the dirt that ends up in the finished paint job falls off the painter. Take precautions.
Never paint panels on a hard surface. Always suspend the panel by attaching it to a wood paint paddle or hanging it from the ceiling. No exceptions.
Once the panels are neatly painted with one thin coat of paint, with care taken to cover the edges and backside of each panel, I sand the painted panels with 600 grit wet sandpaper from 3M. No exceptions.
The final coat of color should be thin and even and perfect. If there are imperfections in the panels, the paint will show them. If a panel has an imperfection after this paint session, it should be re-sanded and painted. Be careful to consider how adding more paint may affect the color; it is never a good idea to do one side of a top hood panel and not the other. Sometimes I can get away with repainting only one fender or door, but not often.
The final step is to use a very fine white polishing compound. This will show up any imperfections which, if I am using lacquer or catalyzed enamel, can be sanded with very fine papers—2000-6000 wet—and given a final polish. Do not skip papers; do not try to use a fine paper to remove a lump of dust. Use a coarse paper—1000-2000 grit—to remove the dirt and then successive papers 4000-8000 grit to achieve a blended gloss. For these ultrafine grits, I use fabric-backed papers that I get from the wood crafters store.
Moral of the story—Sandpaper cannot change a messy paint job into a good one, but it can salvage a few small errors. Learn to sand.
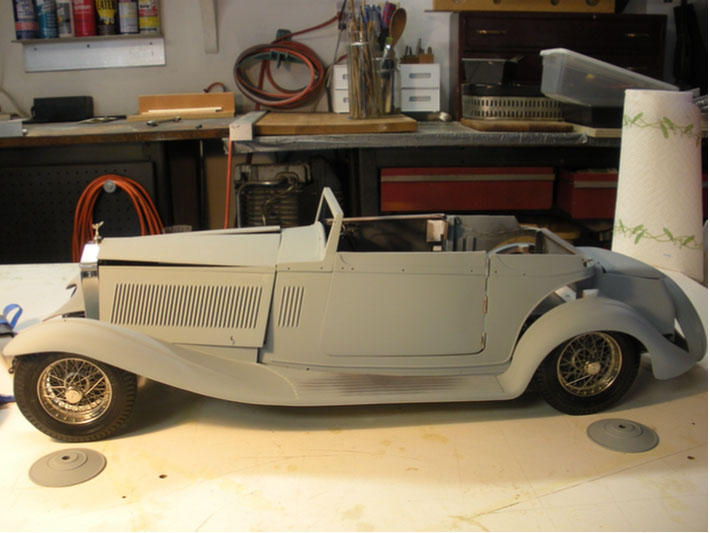
A wise painter once said that the only thing that had to be perfect was the top of the hood and the top of the fenders. Whatever you think of such homilies, it is true that there are many surfaces that require painting and which are also nearly invisible. Hanging the body panels on the chassis gives the painter a sense of which areas are crucial.
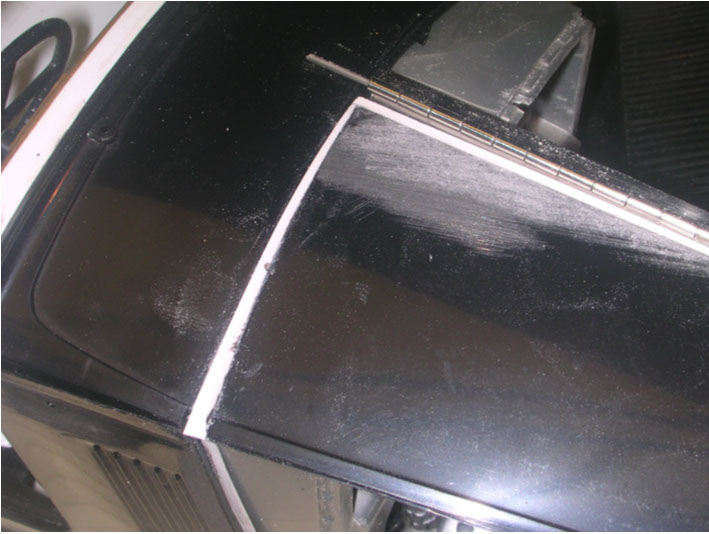
A perfect paint job will not hide bad bodywork. Perfectly painted or not, big gaps between panels will show up, just like crooked panels and misaligned doors. Notice the use of coarse sandpaper (220 grit) to blend the styrene
filler strips to the Pocher hood. This will be sanded with 400 grit paper before priming.

The primer should be perfect. Notice the surface of this fender. The primer has not been sanded yet, but the surface looks good. It will look better once it is sanded with 400 grit dry paper.

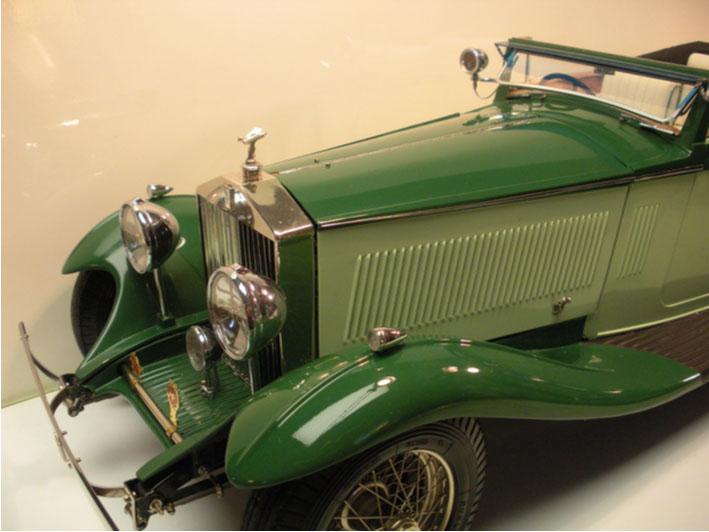
Color counts. The more time spent on considering the color of a model, the more likely the job will be a success. Notice that these Ambassador fenders were painted a color nearly identical to the original Pocher color. It takes just as long to paint a matching color as it does to paint new color, so why not re-think the decision. The bright green here—selected from a color chip chart—was wrong, all wrong, and was changed. This was a difficult decision at this stage, but it would have been an impossible decision later on. Moral—Don’t Rush. And don’t be a cheapskate. A quart of this automotive (PPG Deltron) custom-mixed color was nearly $80 in 2009. Staring at a model RR painted in this color for the next 20 years —priceless.
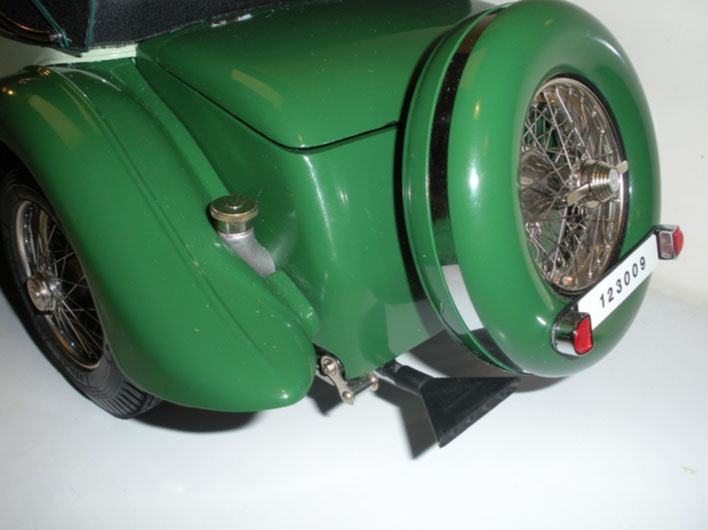
Consider what will show. Notice how much of the trunk is hidden by fenders and a spare wheel. Also important to notice is that the trunk lid is not touching the surface of the trunk edge. Always allow a few days for the paint to cure, even when it is dry to the touch. This is no time to have panels stick together. The dust shown on these panels is the sort that can be blown off with a puff of breath, but it will quickly return because of the static properties of polished plastic and paint! The best way to remove house dust is to use a fluffy make-up brush or an aerosol can of air from the camera shop. Never wipe a paint job with a dry cloth, no matter how soft. Once you have ignored this last rule—and everybody does—use something like Maguire’s Swirl Remover to get rid of the marks left in the paint. Do this a few times and the idea of buying a make-up brush and some canned air will seem like a better idea. Unless you plan on getting bugs off the car, there is no reason to use waxes. Instead, use a bit of Pledge (Johnson & Johnson) or any detail spray for 1:1 cars. They do not leave a white deposit in the body seams, and they do not abrade the surface.
Wear a respirator. No matter how wonderful the model, it is not worth sacrificing your lungs for it.